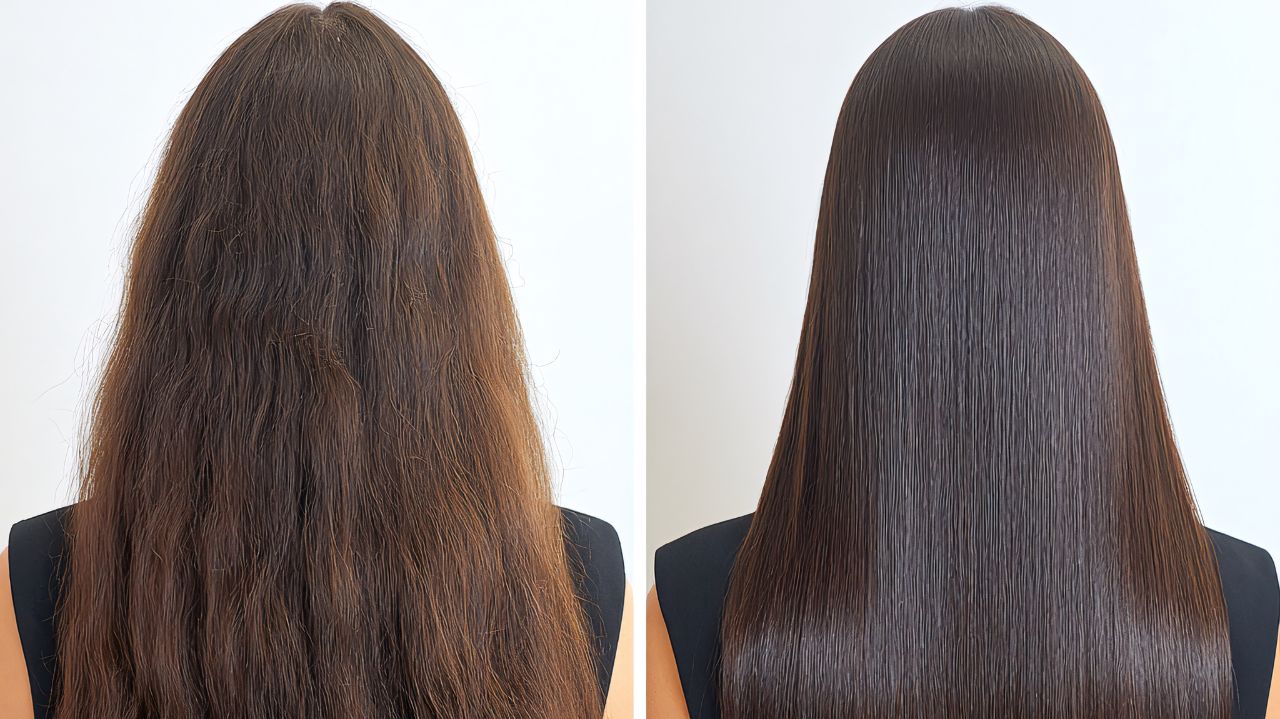
A hair glaze is a semi-permanent hair treatment that sits on the outside of hair strands to add shine, smoothness, and a healthy appearance. It does not penetrate deeply into the hair shaft like some other treatments, but rather acts like a top-coat, sealing the hair cuticle for surface benefits.
How Does Hair Glaze Work?
Hair glaze works by coating the outside of each hair strand, which:
-
Flattens cuticles to create a smooth surface
-
Allows more light to reflect for enhanced shine
-
Helps seal in existing color, slowing down fading
-
Reduces the appearance of frizz and flyaways
This is different from chemical color treatments because a glaze does not lift or permanently alter hair pigment.
Benefits of Hair Glaze
Beyond shine and smoothness, hair glazes offer several important advantages:
Improved Shine
By sealing the cuticle layer, hair looks glossier and more vibrant.
Frizz Reduction
Cuticle sealing helps control frizz, especially in humid weather or dry hair.
Color Enhancement
A tinted glaze can refresh faded tones, make hair appear richer, and help neutralize unwanted undertones (like brassiness).
Protection From Damage
A glaze can act as a protective layer that guards hair from:
-
UV damage
-
Pollution exposure
-
Heat styling
This is because the coating makes hair less porous and more resilient.
Hair Texture Improvement
Hair often feels softer and smoother to the touch after glazing because rough cuticles are sealed and evened out.
How Long Does Hair Glaze Last?
Unlike permanent color treatments, hair glaze is temporary:
-
On average, glaze lasts about 1–2 weeks, fading gradually with washing.
Factors that affect longevity:
-
How often you shampoo
-
Shampoo type (sulfate-free lasts longer)
-
Heat styling and UV exposure
Using gentle hair care products and less frequent washing helps maintain shine longer.
Hair Glaze vs. Alternatives
Here’s how hair glaze compares to other treatments:
Hair Gloss
A hair gloss is a similar service but usually lasts longer (4–6 weeks) and penetrates the cuticle to deposit pigment. Glosses can refresh or change color, whereas glazes mainly add shine and subtle tone.
Hair Dye
Permanent dyes change hair color deeply and can lift or lighten tones. Glazes do not lighten hair — they only enhance and refresh.
How to Apply Hair Glaze
Hair glaze can be done at home or in a salon:
At-home glaze:
-
Typically comes in an easy applicator
-
Applied to clean, damp hair
-
Left on for about 10–20 minutes
-
Rinsed and styled
In-salon glaze:
-
Can be professionally customized to your hair needs
-
Often gives richer, longer-lasting results
Always follow the product instructions and consider patch testing if you have sensitive skin or scalp.
Who Should Use Hair Glaze?
Hair glaze is great for:
-
Anyone with dull or frizzy hair
-
People who want enhanced shine without harsh chemicals
-
Those refreshing color between salon visits
-
All hair types — including curly, straight, colored, or natural hair
It’s especially helpful if your hair is damaged by heat styling, environmental stress, or frequent color treatments because the protective barrier can reduce further weakening.

Hair Glaze Guide: What It Is & How It Works
Equipment
- 1 Large mixing bowl
- 2 9×13-inch baking dish
Ingredients
- 1 kg cupscooked chicken breastshredded or diced
- 2 kg cupsfresh broccoli floretsor frozen, thawed and drained
- 1 kg cupscooked white ricelong grain preferred
- ½ teaspoongarlic powder
Instructions
- Use warm rice so it blends better with the sauce
- Don’t skip seasoning—taste as you go
- Slightly undercook broccoli for best texture
- Let it rest before serving (important!)
Notes
Pioneer Woman Broccoli Chicken Rice Casserole Recipe

Intro
There are certain recipes that feel like a warm hug at the end of a long day, and this Pioneer Woman Broccoli Chicken Rice Casserole is exactly that kind of dish.What is Pioneer Woman Broccoli Chicken Rice Casserole?
The Pioneer Woman Broccoli Chicken Rice Casserole is a classic American comfort dish built around a few humble ingredients: chicken, rice, broccoli, and a creamy sauce. Inspired by Ree Drummond’s signature homestyle cooking, this casserole is all about warmth, simplicity, and family-style meals.Equipment List
Before we start cooking, let’s gather everything you’ll need. Having your tools ready makes the whole process smoother (and honestly, more enjoyable).- Large mixing bowl
- Medium saucepan (for rice)
- Skillet (for chicken, if cooking fresh)
- Cutting board and sharp knife
- 9×13-inch baking dish
- Wooden spoon or spatula
- Measuring cups and spoons
- Aluminum foil
- Steamer or pot for broccoli
Recipe Card Info
- Prep Time: 20 minutes
- Cook Time: 35 minutes
- Total Time: 55 minutes
- Servings: 6 servings
- Cuisine: American
- Course: Dinner
- Calories: 420 kcal per serving
Ingredients
This is where the magic starts. Each ingredient plays a role, and together they create that signature creamy, comforting flavor.- 2 cups cooked chicken breast, shredded or diced
- 2 cups cooked white rice (long grain preferred)
- 2 cups fresh broccoli florets (or frozen, thawed and drained)
- 1 can (10.5 oz) cream of chicken soup
- 1/2 cup sour cream
- 1/2 cup whole milk
- 1 1/2 cups shredded cheddar cheese (divided)
- 1/2 teaspoon garlic powder
- 1/2 teaspoon onion powder
- Salt and black pepper to taste
- 2 tablespoons butter
- 1/2 cup breadcrumbs (optional topping)
Ingredient Deep Dive (Chef’s Notes)
Let me walk you through why each ingredient matters: Chicken: I love using shredded rotisserie chicken here—it’s juicy, flavorful, and saves time. But freshly cooked chicken breast works beautifully too. Rice: White rice gives that soft, comforting texture. It soaks up all the creamy goodness. Slightly overcooked rice actually works better here than firm rice. Broccoli: This is what keeps the dish from feeling too heavy. Its slight bitterness balances the richness perfectly.Instructions (Step-by-Step)
Step 1: Prepare the Ingredients
Preheat your oven to 180°C (350°F). If your chicken isn’t cooked yet, season it lightly with salt and pepper and cook in a skillet until golden and fully done. Let it rest, then shred or dice.Step 2: Make the Creamy Sauce
In a large bowl, mix together:- Cream of chicken soup
- Sour cream
- Milk
- Garlic powder
- Onion powder
- Salt and pepper
Step 3: Combine Everything
Add the cooked chicken, rice, and broccoli into the sauce.Step 4: Assemble the Casserole
Grease your baking dish with butter. Pour the mixture in and spread it evenly. Top with remaining cheese. Add breadcrumbs if you want a golden, slightly crunchy topping. Dot with butter for extra richness.Step 5: Bake to Perfection
Cover with foil and bake for 25 minutes. Then remove the foil and bake for another 10 minutes until the top is golden, bubbly, and slightly crisp.
What Does It Taste Like?
This Pioneer Woman Broccoli Chicken Rice Casserole is everything comfort food should be. The sauce is creamy and savory, with gentle garlic and onion notes. The cheddar adds richness and a slight sharpness that keeps things interesting.Why This Recipe Works So Well
There’s a reason this dish is so loved.- It’s balanced: creamy but not overwhelming
- It uses simple, affordable ingredients
- It’s a complete meal in one dish
- It’s easy to customize
- It feeds a crowd effortlessly
Pro Tips from My Kitchen
After making this countless times, here are my best tips:- Use warm rice so it blends better with the sauce
- Don’t skip seasoning—taste as you go
- Slightly undercook broccoli for best texture
- Let it rest before serving (important!)
- Add a splash of milk when reheating to bring back creaminess
Delicious Variations to Try
Once you’ve mastered the base recipe, you can get creative:Add More Vegetables
Carrots, peas, mushrooms, or bell peppers all work beautifully.Make It Spicy
Add chili flakes or a dash of hot sauce for a gentle kick.Change the Cheese
Try mozzarella for stretchiness or parmesan for a salty finish.Use Brown Rice
Adds a nutty flavor and extra fiber.Make It Lighter
Use low-fat milk, reduced cheese, and light sour cream.Make-Ahead and Meal Prep Tips
This casserole is perfect for busy schedules. You can assemble everything a day ahead, cover, and refrigerate. When ready, bake as directed. It also freezes well. Just wrap tightly and freeze before baking. Thaw overnight before cooking.Storage and Reheating
Store leftovers in an airtight container for up to 3 days in the fridge. To reheat:- Oven: 160°C until warm
- Microwave: 1–2 minutes per portion
What to Serve with This Casserole
This dish is hearty on its own, but I love pairing it with:- Fresh green salad with lemon dressing
- Garlic bread or dinner rolls
- Roasted vegetables
- Simple cucumber yogurt salad
Common Mistakes to Avoid
Even simple recipes have little traps:- Overcooking broccoli (turns mushy)
- Using dry chicken
- Not seasoning enough
- Skipping the resting time
Frequently Asked Questions (FAQs)
Can I use frozen broccoli?
Yes, just thaw and drain it well before using.Can I freeze the casserole?
Absolutely. Freeze before baking for best texture.What rice works best?
White rice is classic, but brown rice works too.Can I make this without soup?
Yes, you can make a homemade white sauce instead.How do I keep it from drying out?
Don’t overbake, and always cover for the first half.Final Thoughts
There’s something special about a dish like this Pioneer Woman Broccoli Chicken Rice Casserole. It’s simple, comforting, and deeply satisfying. For me, it’s more than just a recipe—it’s a reminder that good food doesn’t have to be complicated. Sometimes, the simplest meals are the ones we remember the most.
Pioneer Woman Broccoli Chicken Rice Casserole Recipe
Equipment
-
Large mixing bowl
-
Medium saucepan for rice
-
Skillet (for chicken, if cooking fresh)
-
Cutting board and sharp knife.
-
9×13-inch baking dish
-
Wooden spoon or spatula
-
Measuring cups and spoons.
-
Aluminum foil
-
Steamer or pot for broccoli
Ingredients
Instructions
Step 1: Prepare the Ingredients
-
Preheat your oven to 180°C (350°F).
-
If your chicken isn’t cooked yet, season it lightly with salt and pepper and cook in a skillet until golden and fully done. Let it rest, then shred or dice.
-
Cook your rice according to package instructions. You want it soft and fluffy.
-
Steam the broccoli just until tender but still bright green—about 3–4 minutes. Don’t overcook it, or it will turn mushy later.
Step 2: Make the Creamy Sauce
-
In a large bowl, mix together:
-
Cream of chicken soup
-
Sour cream
-
Milk
-
Garlic powder
-
Onion powder
-
Salt and pepper
-
Stir until smooth. Then add 1 cup of shredded cheddar cheese and mix again.
-
At this point, I always taste the mixture. This is your chance to adjust seasoning. Trust your palate.
Step 3: Combine Everything
-
Add the cooked chicken, rice, and broccoli into the sauce.
-
Gently fold everything together. Take your time here—you want every grain of rice coated, every piece of chicken covered in that creamy mixture.
Step 4: Assemble the Casserole
-
Grease your baking dish with butter.
-
Pour the mixture in and spread it evenly.
-
Top with remaining cheese. Add breadcrumbs if you want a golden, slightly crunchy topping. Dot with butter for extra richness.
Step 5: Bake to Perfection
-
Cover with foil and bake for 25 minutes.
-
Then remove the foil and bake for another 10 minutes until the top is golden, bubbly, and slightly crisp.
-
Let it rest for 5–10 minutes before serving. This step matters—it helps everything set beautifully
Notes
- Use warm rice so it blends better with the sauce
- Don’t skip seasoning—taste as you go
- Slightly undercook broccoli for best texture
- Let it rest before serving (important!)
- Add a splash of milk when reheating to bring back creaminess